


ChatGPT is swiftly become the buzzword of 2023, and it's no surprise why once you experience the AI chat application developed by OpenAI for yourself.
Introduction
In this article, we will be exploring the fascinating world of Natural Language Processing (NLP). We'll dive into what NLP is and how it can be applied to real-world situations beyond just assisting with homework 😬. We'll be looking at some practical examples of how we can use OpenAI's API to interact with their language models and perform actions that are more akin to an AI rather than a simple chatbot.
Before we jump into the nitty-gritty, let's take a moment to familiarise ourselves with what NLP is, what the GPT model is and why it's all the rage and the clear leader in the NLP space.
OpenAI & GPT
Natural Language Processing (NLP) is a branch of Artificial Intelligence (AI) that focuses on enabling computers to interpret, understand, and generate human language.
OpenAI is an artificial intelligence research laboratory co-founded by notable figures in the tech industry, such as Elon Musk, Sam Altman, Greg Brockman, Ilya Sutskever, Wojciech Zaremba, and John Schulman. The organization has a dedicated focus on creating and advancing artificial intelligence.
GPT, short for "Generative Pre-training Transformer," is one of the first successful large-scale NLP models developed by OpenAI. It has made a significant impact on the field of natural language processing, and GPT-3, in particular, was a major breakthrough.
The development of GPT has enabled advancements in various applications such as language translation, content creation, question-answering systems, and chatbots. OpenAI continues to conduct research on GPT models and other AI technologies and has quickly positioned itself as the leader in this space.
While GPT-3 and GPT-4 have received a lot of attention and recognition, it's essential to keep in mind that other companies like Google have been working on their own NLP models; although competitors have a lot of ground to catch up, I wouldn't be surprised if we start to see a shift away from focusing solely on GPT and start talking more about AI language models in general.
Difference between ChatGPT & GPT
Understanding the distinction between ChatGPT and GPT is essential for those who are navigating the world of natural language processing. Let's break down the terminology to ensure clarity and consistency in your knowledge.
ChatGPT is a user-friendly web app accessible via your browser, designed to showcase the capabilities of the GPT natural language model in a chatbot format.
This chatbot application can engage in various tasks, in an interactive way, such as crafting stories, explaining code, or writing poems, by leveraging the power of the GPT NLP family.
In contrast, GPT is a language model itself, not an app. While there is an OpenAI playground that allows you to experiment with GPT, it's important to recognise that GPT is not an app. Instead, it's a versatile language model that can be customised for various functions.
OpenAI has developed an open API that provides access to the GPT NLP family, allowing anyone to create their own AI applications using its functions. The ChatGPT app, for example, relies on this API to interact with the GPT language models. GPT's capabilities also serve as the foundation for several other AI applications, such as Jasper, Intercom, Grammarly, and Bing's new AI search feature.
If you want the TLDR; ChatGPT is a web app showcasing GPT's capabilities, and GPT is the underlying language model that powers various AI applications through the OpenAI API like ChatGPT.
TwistedBot
Before we dive into a practical example of how to use OpenAI's API, I'd like to share a working example with you. You'll notice a small icon on the bottom left of this article that you can click to interact with my own ChatBot TwistBot.
Go ahead and ask it any questions you may have about JavaScript, CSS, HTML, and everything in between!
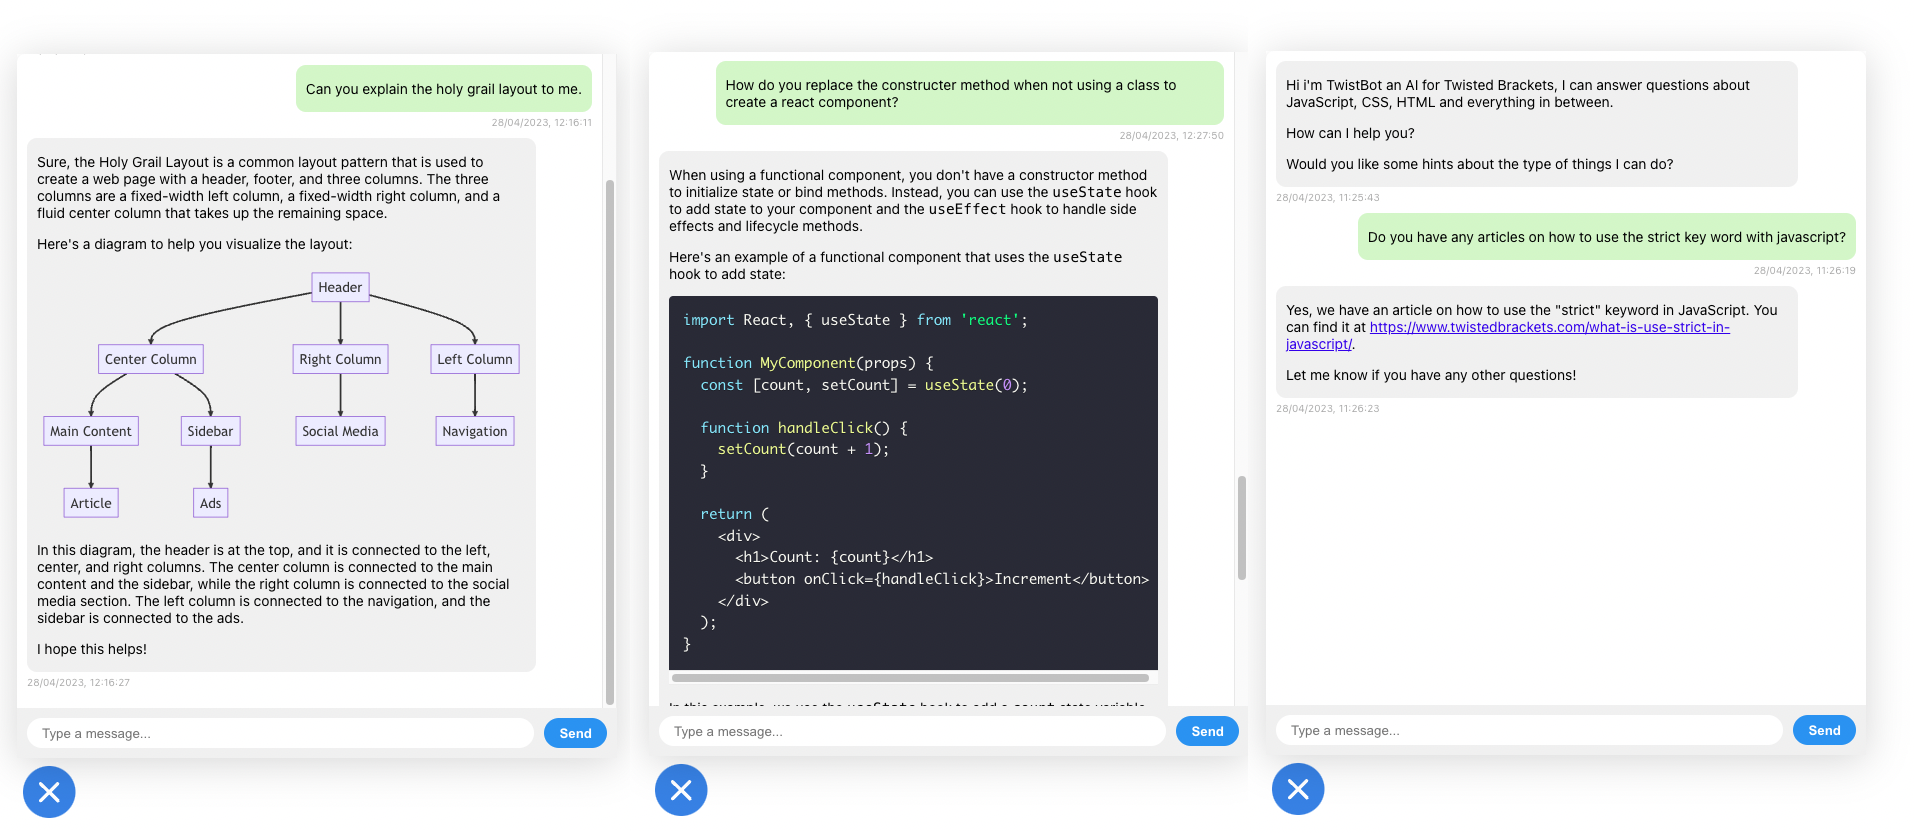
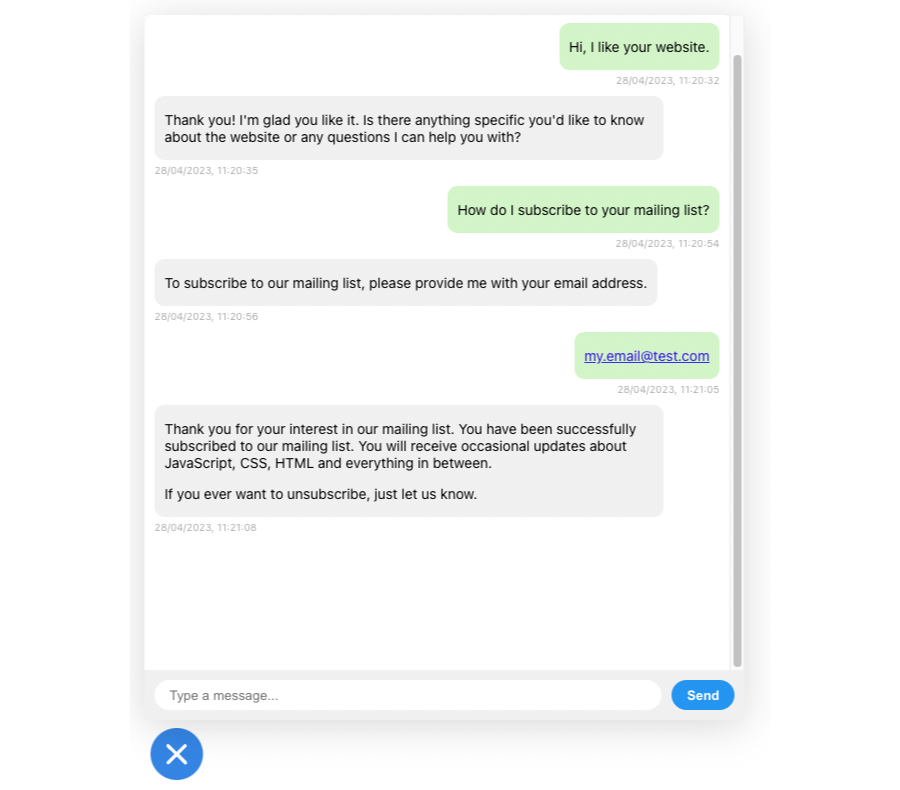
I've extended my bot well beyond the scope of this article, so it can now respond to specific requests and actions. If you're interested in learning more about this, feel free to ask the bot to subscribe you to the mailing list or even ask TwistBot to send me an email requesting topicks for future posts`, TwistBot will try to aid you.
Building our own chatbot
Now that we've gained an understanding of what GPT is, let's have some fun and explore the API together.
In this activity, we'll keep it simple to start and create our very own chatbot AI based on the GPT-3.5-turbo model. We'll make it specifically cater to Twisted Brackets and narrow down the range of questions it can tackle and responses it can give.
Bootstrap a Node and Express server
First, let's create a basic Node.js Express app with a single API endpoint at http://localhost:3000/chat.
cd into your app directory and initialize the Express app using your package manager of choice; I'm using Yarn.
yarn initYou will be prompted to enter some information about your project, such as name, version, description, etc. You can press enter to accept the defaults or enter your own values.
Not install the Express library and save it as a dependency:
yarn add expressThis will install the latest version of the Express library and add it as a dependency in your package.json file.
Once that is done, create a new file called index.js in the root directory of your project:
touch index.jsNow open the index.js file in your text editor and copy-paste the following code:
const express = require('express');
const app = express();
const PORT = process.env.PORT || 3000;

app.use(express.json());

app.post('/chat', (req, res) => {
  res.status(404).send('Not implemented ‘yet);
});

app.use((req, res) => {
  res.status(404).send('Not Found');
});

app.listen(PORT, () => {
  console.log(`Server listening on port ${PORT}`);
});
In this code, we first import the express library and create a new instance of the app. We then set the PORT variable to either the value of the process.env.PORT environment variable or 3000.
Next, we use the express.json() middleware to parse incoming JSON requests. This allows us to access the JSON data in the request body using req.body. We will use this to pass conversations to our chatbot in a structured format.
We then create a single API endpoint using the app.post() method, which listens for POST requests to the '/chat' URL. This is where we will be adding our chat response code shortly.
Finally, we add a catch-all route using the app.use() method to return a 404 error for any other requests that do not match our defined API endpoint.
Running the server
We're now ready to test our server! To make it convenient and easy, we'll add a few scripts to our package.json file. This will allow us to use npm run or yarn run commands, depending on your package manager, to run our server.
First, let's create a "start" script to run our Node Express server. We'll be using this script for running the server in a production environment. Add the following code to the root level of your package.json file:
"scripts": {
	"start": "node index.js"
},
With this in place, you can run the server using the yarn start command.
During development, it can be tedious to manually stop and restart the server every time we make changes. To address this, we'll use the nodemon library, which monitors changes in the index.js file and automatically restarts the server when needed.
First, add nodemon as a development dependency with the following command:
yarn add nodemon --devNext, update your package.json scripts section to include the "start:dev" script:
"scripts": {
	"start": "node index.js",
	"start:dev": "nodemon index.js"
},
Now, simply run yarn start:dev to start the development server. With nodemon in place, the server will automatically restart whenever you make changes to the code.
Integrating the OpenAI API.
First, we need to create an account with OpenAI and obtain an API key. You can sign up for an account on the OpenAI website and follow the instructions to get an API key.
Once we have the API key, install the OpenAI Node package in your app using npm or yarn. Run the following command in your terminal:
yarn add @openai/apiNow that we have the OpenAI Node package installed, you can create an instance of the API client in your app.
const { Configuration, OpenAIApi } = require("openai");

const configuration = new Configuration({
    apiKey: process.env.OPENAI_API_KEY,
});

const openai = new OpenAIApi(configuration);
We will add this to the top of our script, as we only want to initiate it once and not every API call.
In this example, we're using process.env.OPENAI_API_KEY to access the API key stored in an environment variable. You can replace this with your API key directly, but using environment variables is recommended for security reasons.
ChatBot Context
Let's take a closer look at our prompt, which is a JSON object that contains two elements with a specific format. Each element within our prompt array will have a "role" and a "content" property. The "role" property indicates whether the content is provided by the system, assistant, or user, while the "content" property contains the actual text of the prompt.
We'll be working with three different types of roles, each with their own purpose:
- System: The "system" refers to the ChatBot itself and is used to train the ChatBot on how to behave and manage responses.
- Assistant: The "assistant" refers to the ChatBot's persona or character. The assistant is the personality or voice of the ChatBot that interacts with the user.
- User: The "user" is the person or entity that is interacting with the ChatBot. We'll be adding our responses as user roles in the next step.
Now add out prompt someware towards the top of out script.
const seed = [{
    "role": "system",
    "content": "You are an AI assistant for the Twisted Bracket website called \"TwistBot\". Stay in character at all times. \n\nYou are able to answer questions about the twisted bracket website, www.twistedbrackets.com, JavaScript, HTML, CSS, software engineering concepts and the website author Levi Putna. \n\nIf asked you a question you can answer the question as truthfully as possible, and if you're unsure of the answer, say \"Sorry, I don't know the answer to that.\"\n\nIf you are asked questions that are not related to twisted bracket website, www.twistedbrackets.com, JavaScript, HTML, CSS and the website author Levi Putna responde with \"I'm the Twisted Brackets AI, I only know now to answer questions about the twisted brackets, JavaScript, HTML, CSS and the website author Levi Putna. \\n\\nWhat else can I help you with?\"\n\nIf you need information about the author, his name is Levi Putna, he studied a Bachelor of Information Technology, Business/Commerce, General at James Cook University. He is currently employed as the general manager of Oz Lotteries and online lottery retail business based out of australia. More information about the author is available at https://www.twistedbrackets.com/about/"
}, {
    "role": "assistant",
    "content": "Hi i'm TwistBot the AI for Twisted Brackets, how can I help you?"
}]
For our prompt, we have two parts. The first element in the array with the "system" role provides information about the AI assistant and the context in which it operates, including its capabilities and limitations. The second element with the "assistant" role is the initial greeting from the assistant.
Our initial "system" prompt provides instructions for our AI language model to act as an AI assistant named "TwistBot" an AI for the Twisted Bracket website.
We direct the AI to stay in character as TwistBot and answer questions related to the Twisted Bracket website, JavaScript, HTML, CSS, software engineering concepts, and the website's author, Levi Putna.
We instruct the AI to provide truthful answers to the best of its ability. If it is unsure or doesn't know the answer, it should acknowledge that it doesn't have the information.
If the AI is asked questions outside of the specified topics, it will remind the user that it's the Twisted Brackets AI and can only answer questions related to the topics mentioned.
As we interact with our ChatBot, we'll be adding our own messages to this array as user roles. This will allow us to guide the conversation in a specific direction and provide more accurate and helpful responses to the user. By using the different roles in our prompt, we can create a more natural and engaging conversation that feels like a real interaction between the user and the ChatBot.
Continuing the conversation
Let's dive into adding and implementing the /chat endpoint response for our ChatBot. To get started, we need to build out the content of our conversation. Since the API we're building is stateless, the context of the conversation will be managed by the client.
To build out a continuing discussion, the client will need to pass the existing conversation context, along with the new message we've provided, then combine this with the prompt to build out the conversation context. We can then pass this context to the OpenAI API to generate a response.
To build out our conversation content, we'll combine the existing context from the client using req.body.context and the new message from req.body.message with our prompt. This will allow us to generate a response that's relevant to the context of the conversation so far.
Inside app.post('/chat', async (req, res) => {} add:
let context = req.body.context;
let message = req.body.message;

const conversations = [...seed, ...context, {
	"role": "user",
    "content": message
}]
OpenAI API Response
Now it's time to use the OpenAI API to generate a response based on the conversation context and send it back to the user. We'll do this by adding the following code below where we declared our conversation context variable:
const response = await openai.createChatCompletion({
	model: "gpt-3.5-turbo", //
	messages: conversations,
	temperature: 0.2,
	max_tokens: 500,
	top_p: 1,
	frequency_penalty: 0.0,
	presence_penalty: 0.0,
});
This code is using the OpenAI API to generate a chat response based on the provided conversation context. You dont need to understand all the parameters, but here is a quick outline:
model: This parameter specifies which language model to use for generating the response. In this case, we're using thegpt-3.5-turbomodel, but there are a number of other GPT-3 and GPR-4 model available. I have been usinggpt-3.5-turbodue to the speed of response and cost of tokens.messages: This parameter is an array of previous messages in the conversation. It's used to provide context and continuity to the conversation. This is where we are passing in the conversations we built.temperature: This parameter controls the level of randomness and creativity in the generated response. A lower temperature will result in more conservative and predictable responses, while a higher temperature will result in more creative and unexpected responses.max_tokens: This parameter sets the maximum length of the generated response in terms of the number of tokens (words and punctuation).top_p: This parameter controls the level of randomness in the generated response, similar to thetemperatureparameter. A highertop_pvalue will result in more diverse and creative responses.frequency_penaltyandpresence_penalty: These parameters control how often certain words or phrases are used in the generated response. A higher penalty value will reduce the frequency or presence of certain words or phrases, while a lower penalty value will allow them to be used more freely. I have found keeping this at0produces the most natrial response for a ChatBot
Finally, we need to grab the response from OpenAI and add it to our conversation context for the next request, making sure not to include the seed as we dont want users to understand how we are prompting our AI, and send it back to the user. We'll send the response back as part of the conversation context and as its own string for simplicity. You can add your own logic to outline how you manage this.
const responseMessage = response.data.choices[0].message.content.trim();

const responseMessage = response.data.choices[0].message.content.trim();

        const responseContext = [...context, {
            "role": "user",
            "content": message
        },
        {
            role: "assistant",
            content: responseMessage
        }];

res.send({ message: responseMessage, context: responseMessage });
Your final code should look like this.
const express = require('express');
const { Configuration, OpenAIApi } = require("openai");

const app = express();
const PORT = process.env.PORT || 3000;

app.use(express.json());

const configuration = new Configuration({
    apiKey: "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",
});

const openai = new OpenAIApi(configuration);

const seed = [{
    "role": "system",
    "content": "You are an AI assistant for the Twisted Bracket website called \"TwistBot\". Stay in character at all times. \n\nYou are able to answer questions about the twisted bracket website, www.twistedbrackets.com, JavaScript, HTML, CSS, software engineering concepts and the website author Levi Putna. \n\nIf asked you a question you can answer the question as truthfully as possible, and if you're unsure of the answer, say \"Sorry, I don't know the answer to that.\"\n\nIf you are asked questions that are not related to twisted bracket website, www.twistedbrackets.com, JavaScript, HTML, CSS and the website author Levi Putna responde with \"I'm the Twisted Brackets AI, I only know now to answer questions about the twisted brackets, JavaScript, HTML, CSS and the website author Levi Putna. \\n\\nWhat else can I help you with?\"\n\nIf you need information about the author, his name is Levi Putna, he studied a Bachelor of Information Technology, Business/Commerce, General at James Cook University. He is currently employed as the general manager of Oz Lotteries and online lottery retail business based out of australia. More information about the author is available at https://www.twistedbrackets.com/about/"
}, {
    "role": "assistant",
    "content": "Hi i'm TwistBot the AI for Twisted Brackets, how can I help you?"
}]

app.post('/chat', async (req, res) => {
    try {

        let context = req.body.context || [];
        let message = req.body.message;

        const conversations = [...seed, ...context, {
            "role": "user",
            "content": message
        }]

        const response = await openai.createChatCompletion({
            model: "gpt-3.5-turbo", //
            messages: conversations,
            temperature: 0.2,
            max_tokens: 500,
            top_p: 1,
            frequency_penalty: 0.0,
            presence_penalty: 0.0,
        });

        const responseMessage = response.data.choices[0].message.content.trim();

        const responseContext = [...context, {
            "role": "user",
            "content": message
        },
        {
            role: "assistant",
            content: responseMessage
        }];

        res.send({ message: responseMessage, context: responseContext });
    } catch (error) {
        console.error(error);
        res.status(500).send({
            message: 'Oops, there was an issue processing the message. \n\nPlease give it a moment and try again.',
            error: error,
        });
    }
});

app.use((req, res) => {
    res.status(404).send('Not Found');
});

app.listen(PORT, () => {
    console.log(`Server listening on port ${PORT}`);
});Making a Request
Now that we have a working server, lets make an API requies. You can use Postman or curl.
curl --location 'localhost:3000/chat' \
--header 'Content-Type: application/json' \
--data '{
    "contect": [],
    "message": "Hello, whats your name?"
}'We should get a response back that looks something like this:
{
    "message": "My name is TwistBot, I'm the AI assistant for the Twisted Bracket website. How can I assist you today?",
    "context": [
        {
            "role": "user",
            "content": "Hello, whats your name?"
        },
        {
            "role": "assistant",
            "content": "My name is TwistBot, I'm the AI assistant for the Twisted Bracket website. How can I assist you today?"
        }
    ]
}If we want to continue our conversation, we can pass the returned context into our next request like so.
curl --location 'localhost:3000/chat' \
--header 'Content-Type: application/json' \
--data '{
    "contect": [
        {
            "role": "user",
            "content": "Hello, whats your name?"
        },
        {
            "role": "assistant",
            "content": "My name is TwistBot, I'\''m the AI assistant for the Twisted Bracket website. How can I assist you today?"
        }
    ],
    "message": "Can you tell me about Twisted Bbackets?"
}'And our AI will return a mesage that continues on the conversations.
{
    "message": "Twisted Brackets is a website that provides resources and tutorials for web developers. It covers topics such as HTML, CSS, JavaScript, and software engineering concepts. The website is authored by Levi Putna, who is a web developer and IT professional.",
    "context": [
        {
            "role": "user",
            "content": "Can you tell me about Twisted Bbackets?"
        },
        {
            "role": "assistant",
            "content": "Twisted Brackets is a website that provides resources and tutorials for web developers. It covers topics such as HTML, CSS, JavaScript, and software engineering concepts. The website is authored by Levi Putna, who is a web developer and IT professional."
        }
    ]
}Summary
We now have a very basic ChatBot API that you can start playing with. You can give your chatbot more personality by using different prompts, or even feed it additional information to enhance its responses.
Furthermore, you can train OpenAI to respond in specific ways to certain prompts, which can enable you to perform additional actions before replying to the user. This is how my chatbot performs actions like subscribing users to my blog, sending emails, or searching the blog articles. The possibilities are endless! For instance, the Intercom AI can perform actions such as looking up customer purchases and initializing refunds without the need for a human to get involved.
If you'd like to learn more about how I trained my AI to perform actions or see how I created my chat client, feel free to ask Twist Bot to send me an email, and I'll do my best to help you out. Also, you can find the code for this tutorial on this Github repository: https://github.com/levi-putna/openai-chatbot/tree/tutorials/part-1